Connect a WOPI adapter
A WOPI adapter connects Thinkfree Office to a document server that implements the WOPI protocol. WOPI (Web Application Open Platform Interface) is a standard protocol that defines the communication between a server that stores documents (the WOPI host) and a web application that opens and edits them (the WOPI client). If you already run a document management system that acts as a WOPI host, you can connect Office as its editor without changing your storage.
Unlike other adapters, the WOPI host is the one that opens documents. Instead of building an Office document URL yourself, the host reads Office's discovery information and launches the editor with a per-document access token. This guide therefore explains how to register the adapter in the admin page and how to open Office from your WOPI host.
Prepare connection details
Prepare the file endpoint address of your WOPI host and the Office address.
| Field | Value to prepare |
|---|---|
| File endpoint | The address where the WOPI host receives file requests. Office calls it as {FILE_ENDPOINT}/{FILE_ID}.Example: https://wopi.example.com/wopi/files. It must be reachable from the Office server. |
| Office address | The Office address that the user's browser uses to reach the editor. Use only the scheme, host, and port, without a path. Example: http://localhost:8080 |
The WOPI host must implement the following WOPI operations.
Office sends the access token both as the access_token query parameter and in the Authorization: Bearer header, so the host can verify the token from either one.
| WOPI operation | Request | Purpose |
|---|---|---|
| CheckFileInfo | GET {FILE_ENDPOINT}/{FILE_ID} | Retrieve the document name, size, permissions, and user name. Required to open a document |
| GetFile | GET {FILE_ENDPOINT}/{FILE_ID}/contents | Download the document contents. Required to open a document |
| Lock, RefreshLock, Unlock | POST {FILE_ENDPOINT}/{FILE_ID} with the X-WOPI-Override header | Acquire, extend, and release the lock while editing |
| PutFile | POST {FILE_ENDPOINT}/{FILE_ID}/contents with the X-WOPI-Override: PUT header | Save the entire edited document |
Office uses the following fields from the CheckFileInfo response.
| CheckFileInfo field | How Office uses it |
|---|---|
BaseFileName | The document name shown in the editor. The extension determines the document type. |
Size | The document size |
UserCanWrite | Saving is allowed only when this is true. |
UserFriendlyName | The user name shown in the collaborator list and on cursors. Falls back to UserId when absent. |
Add a WOPI adapter
The screenshot below shows example values in the admin page. Enter the file endpoint of your own host in WOPI Host URL.
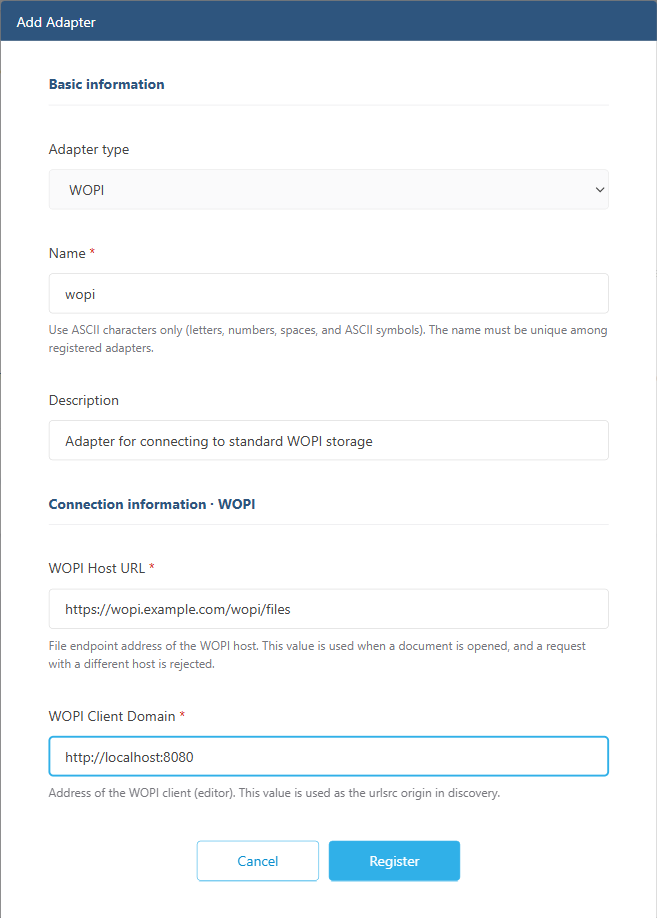
- Under External linkage in the Office admin page, click Add Adapter.
- Select WOPI as the Adapter type.
- Enter the following connection details.
| Field | Value to enter |
|---|---|
| Name | wopi. The editor launch page looks up the adapter by this name, so do not use a different name. |
| Description | What the adapter is used for. You can keep the prefilled description. |
| WOPI Host URL | The file endpoint, including its path. Example: https://wopi.example.com/wopi/files |
| WOPI Client Domain | The Office address, without a path. Example: http://localhost:8080 |
- Click Register. WOPI requires a per-document access token to call the host, so the adapter is registered without a connection test.
- Check that
wopiis running in the adapter list.
WOPI Host URL is the only address Office sends requests to when opening a document.
If the part of WOPISrc before the file ID sent by the host differs from this value, Office refuses to open the document.
WOPI Client Domain is used as the prefix of the editor launch addresses in the discovery XML.
The discovery XML uses the WOPI Client Domain of a single running WOPI adapter. To switch hosts, update the registered adapter.
Check discovery
After registering the adapter, append /hosting/discovery to the Office address to view the discovery XML that your WOPI host will read.
curl http://localhost:8080/hosting/discovery
The response contains the editor launch address for each file extension and the public key for verifying requests. The following is an excerpt.
<wopi-discovery>
  <net-zone name="external-http">
    <app name="writer">
      <action default="true" ext="docx" name="edit" requires="update,locks" urlsrc="http://localhost:8080/hosting/word.html?"/>
      <action default="true" ext="dotx" name="view" urlsrc="http://localhost:8080/hosting/word_v.html?"/>
    </app>
    <app name="calc">
      <action default="true" ext="xlsx" name="edit" requires="update,locks" urlsrc="http://localhost:8080/hosting/spreadsheet.html?"/>
    </app>
    <app name="presentation">
      <action default="true" ext="pptx" name="edit" requires="update,locks" urlsrc="http://localhost:8080/hosting/presentation.html?"/>
    </app>
  </net-zone>
  <proof-key value="..." modulus="..." exponent="AQAB" oldvalue="..." oldmodulus="..." oldexponent="AQAB"/>
</wopi-discovery>
The prefix of each urlsrc is the WOPI Client Domain you entered in the admin page.
If no WOPI adapter is registered or the adapter is stopped, the response is 503 with a message asking you to register an adapter.
Open a document from the WOPI host
Select the editor launch address
The host selects the urlsrc of the action whose extension (ext) and action name (name) match the document.
edit opens the editor and view opens the viewer.
| Document | Editor urlsrc | Viewer urlsrc |
|---|---|---|
Word (docx and others) | {WOPI_CLIENT_DOMAIN}/hosting/word.html? | {WOPI_CLIENT_DOMAIN}/hosting/word_v.html? |
Cell (xlsx and others) | {WOPI_CLIENT_DOMAIN}/hosting/spreadsheet.html? | {WOPI_CLIENT_DOMAIN}/hosting/spreadsheet_v.html? |
Show (pptx and others) | {WOPI_CLIENT_DOMAIN}/hosting/presentation.html? | {WOPI_CLIENT_DOMAIN}/hosting/presentation_v.html? |
Send the editor launch request
The host appends the WOPISrc query parameter to the selected urlsrc and submits the access token from the browser as a POST request in the access_token form field.
WOPISrc is the URL-encoded address of the file endpoint followed by the file ID as a single path segment.
The following form opens the Word document with file ID doc-001 in the editor.
<form method="post" action="http://localhost:8080/hosting/word.html?WOPISrc=https%3A%2F%2Fwopi.example.com%2Fwopi%2Ffiles%2Fdoc-001">
  <input type="hidden" name="access_token" value="{ACCESS_TOKEN}" />
  <button type="submit">Open in Office</button>
</form>
Office receives this request and opens the editor using the file ID and access token.
If access_token is missing, Office returns 400.
The part of WOPISrc before the file ID must match the WOPI Host URL in the admin page. In this example, it is https://wopi.example.com/wopi/files.
The access token is a value that the host issues and verifies per user and document. Office does not interpret the token; it passes the token unchanged in every request to the host.
Check the requests Office sends to the host
Once the editor opens, Office calls the host in the following order. Every request URL carries the access_token query parameter.
| When | Request | Headers |
|---|---|---|
| Opening the document | GET {FILE_ENDPOINT}/{FILE_ID} (CheckFileInfo) | - |
| Opening the document | GET {FILE_ENDPOINT}/{FILE_ID}/contents (GetFile) | - |
| Starting to edit | POST {FILE_ENDPOINT}/{FILE_ID} (Lock) | X-WOPI-Override: LOCK, X-WOPI-Lock: TFO:{FILE_ID} |
| Every 10 minutes while editing | POST {FILE_ENDPOINT}/{FILE_ID} (RefreshLock) | X-WOPI-Override: REFRESH_LOCK, X-WOPI-Lock: TFO:{FILE_ID} |
| Saving | POST {FILE_ENDPOINT}/{FILE_ID}/contents (PutFile) | X-WOPI-Override: PUT, X-WOPI-Lock: TFO:{FILE_ID} |
| Closing the document after editing | POST {FILE_ENDPOINT}/{FILE_ID} (Unlock) | X-WOPI-Override: UNLOCK, X-WOPI-Lock: TFO:{FILE_ID} |
The lock ID is per document: TFO:{FILE_ID}.
Every user who opens the same document sends the same lock ID, so the host must treat a Lock request for a document already locked with the same ID as a lock refresh for co-editing to work.
For a document locked with a different ID, respond with 409 and return the current lock ID in the X-WOPI-Lock header.
Following the WOPI standard, the host can expire a lock that has not been refreshed for 30 minutes, and Office extends the lock before it expires.
PutFile sends the entire edited document as the request body.
The host saves only when X-WOPI-Lock matches the current lock and returns 200 on success.
Verify requests
Office adds the X-WOPI-Proof, X-WOPI-ProofOld, and X-WOPI-TimeStamp headers to every request it sends to the host.
The host can verify the signature with the public key in the proof-key element of the discovery XML to confirm that the request came from Office.
X-WOPI-Proofis signed with the current key (value) andX-WOPI-ProofOldwith the previous key (oldvalue). Office rotates the key every 6 months, so trust the request if either header verifies.X-WOPI-TimeStampis the request time in .NET ticks. Office generates a new value for every request, so the host can reject timestamps older than 20 minutes.- For a request that fails verification, put the reason in the
X-WOPI-ServerErrorheader of the error response. Office writes this value to its log, which makes the cause easier to find.
Verify the connection
- Open a Word document from the host and check that the Office editor appears in a new window or frame.
- Edit and save the document, then check that the host received the PutFile request and updated the document.
- Close and reopen the document to check that your changes persist.
- Open the same document as two users to check that co-editing works.
If something goes wrong, check the following.
| Symptom | What to check |
|---|---|
The discovery request returns 503. | Check that a WOPI adapter is registered and running. |
| An error page appears instead of the editor. | Check that the adapter name is wopi and that the part of WOPISrc before the file ID matches WOPI Host URL. |
The editor launch request returns 400. | Check that the form includes the access_token field. |
The host returns 401. | Check the host's access token verification and the token lifetime. |
The Lock request returns 409. | Check whether another client locked the document. If the lock ID is TFO:{FILE_ID}, treat the request as a lock refresh. |
| The document opens but does not save. | Check that UserCanWrite in CheckFileInfo is true and that PutFile verifies X-WOPI-Lock and returns 200. |
Learn more: How the WOPI integration works
A WOPI integration consists of the WOPI host that stores documents, Thinkfree Office as the WOPI client that edits them, and the user's browser that moves between the two servers.
Once you register a WOPI adapter in the admin page, Thinkfree Office starts serving the WOPI discovery XML at /hosting/discovery, and the integration then works in the numbered order shown in the diagram.
- The WOPI host reads the discovery XML to find the editor launch address (
urlsrc) for each file extension and the public key (proof-key) for verifying requests. - When a user opens a document on the host, the host sends the browser to the editor launch address with the document address (
WOPISrc) and the access token (access_token). - When the browser reaches the editor launch address, Thinkfree Office opens the editor.
- Thinkfree Office uses the access token to request the document information and contents from the host, displays the document, holds a lock while editing, and sends the changed document back to the host on save.